Datomic On Heroku with DynamoDB
Datomic On Heroku with DynamoDB
In my earlier post I describe how to use get Datomic up and running on Heroku Private Spaces. The great advantage of this system is the avoidance of any infrastructure management. You deploy your transactor like any other app.
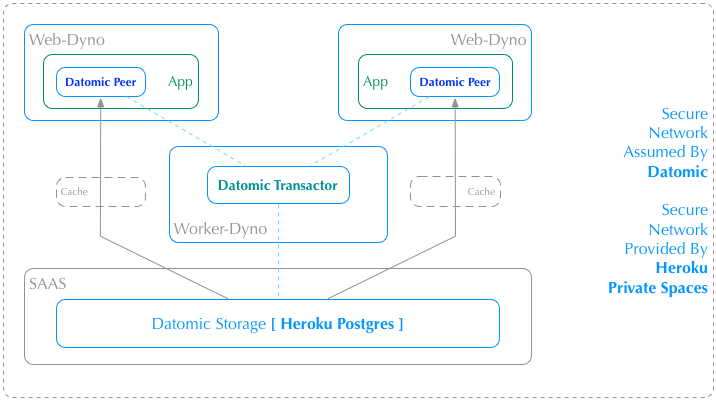
For that piece I describe how to use Heroku Postgres as a storage back-end. Heroku Postgres is a fine service for running systems that are optimised for SQL and has many interesting features, such as forking, which make it extremely agile. It is also possible to have a database running in the same Private Space as your transactor which could be important for security. Finally, also on a security note, some high end instances of Heroku Postgres have an Encryption At Rest feature and that might be a requirement for your business.
As a refresher, this is what it looks like on Heroku:
Datomic and DynamoDB
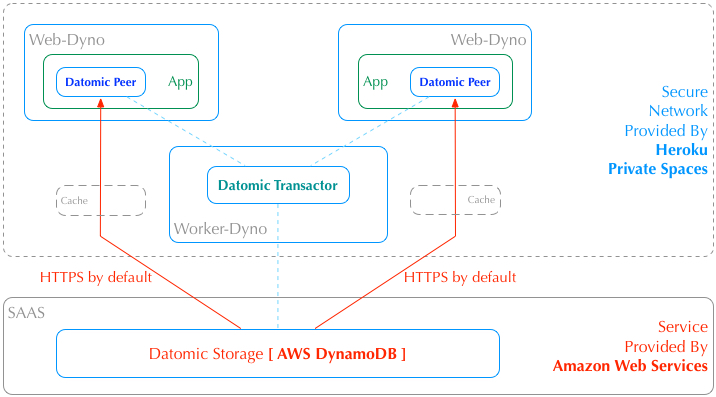
But of course Datomic has other storage options, including the AWS DynamoDB. In this article I will show how we can use the same facilities for deploying apps and the transactor in a Heroku Private Space but use DynamoDB rather than Heroku Postgres as a storage option.
This is what it looks like when we use DynamoDB:
Chocolate and ice-cream
As a final background note, you should also bear in mind that it is perfectly possible to have multiple transactors with different storage back-ends and to have them all still be reachable and usable by the same Peer.
Transactor app
Getting into the details, the process is very similar to the set up for Postgres with a few small tweaks. For the sake of completeness I am going to charge through the whole process again here so that you don’t have to pick apart the differences.
Create your transactor app
heroku apps:create my-xtor -s my-spaceConfigure the Datomic buildpack
heroku buildpacks:set https://github.com/opengrail/heroku-buildpack-datomic -a my-xtorProvision your database
Follow the guidelines for setting up DynamoDB in the Datomic Storage documentation. The build pack only supports the simplest automation process so you will need to follow that route.
Clone the demo transactor app
git clone https://github.com/raymcdermott/space-xtorConfigure your Datomic license for Heroku
heroku config:set DATOMIC_LICENSE_PASSWORD=license-password
heroku config:set DATOMIC_LICENSE_USER=license-user
heroku config:set DATOMIC_TRANSACTOR_KEY=license-key
Configure you storage
Configure the buildpack to use DynamoDB rather than the default (which is Heroku Postgres) and provide your AWS account details to Heroku set the configuration variables for your app like this:
heroku config:set DATOMIC_STORAGE_TYPE=DYNAMODB
heroku config:set AWS_ACCESS_KEY_ID=aws-access-key-id
heroku config:set AWS_SECRET_KEY=aws-secret-key
Push the app
git push heroku masterCreate your web app
heroku apps:create my-xtor-web-front -s my-spaceAttach your database
Configure the database and the AWS region that your system is running on. For US EAST do this:
heroku config:set DYNAMO_DATABASE_URL=datomic:ddb://us-east-1/your-system-name/heroku-spacesClone the demo web app
git clone https://github.com/opengrail/xtor-web-frontPush the demo web app
git push heroku masterTest it all out
heroku open -a my-xtor-web-frontOperating costs
Be careful to watch your dyno use on Heroku as it’s possible to go beyond the free tier if you play for too long.
Likewise DynamoDB is low cost to start out can add up if you hit it hard.
You should be aware that Heroku Private Spaces is a beta product that is currently only available to Heroku Enterprise customers. That usually means you have a paid up front account.
Obviously you can spend as much as you want with Datomic or DynamoDB once you get going.
The code for the build packs and the sample apps are all on github so you can fork away and please let me know if there are any problems or suggestions for improvements.
Thanks
Thanks for making it through, I hope you enjoy the wonders of Datomic on a great PAAS / DBAAS combination.
Zing me or ping me if this was useful via Twitter.